
-
 6453 Hits
-
 71.06% Score
-
 1 Votes
|
|
Route |
|---|---|
|
|
39.74966°N / 106.33687°W |
|
|
Hiking, Mountaineering, Bouldering, Mixed, Scrambling |
|
|
Summer, Fall, Winter |
|
|
A long day |
|
|
Technical, Strenuous |
|
|
Class 4 |
|
|
Overview and Access
Peak C is a great area for any mountaineer to explore or build their skills. The northwest ridge offers highly exposed class 5 climbing (which I have only worked around) while the the south face offers a great class 4 area. There is also a class 3 scramble for a non-technical and unexposed ascent, which could easily double for a winter outing. This page will help you decide what difficulty level you are aiming for, and which routes to take up to the peak.From Vail, first take the Red Sandstone Road to its end at Piney Lake. The road is passable for most utility vehicles. The trailhead from Piney Lake skirts private property at the Piney River Ranch. Not far from the trailhead, you will enter the Eagle's Nest Wilderness.
But first, and most helpful for climbers and hikers alike, is some clarification on using the social trail from the Piney River. The mountain always requires more time than I expect, and it can be a challenge to summit before summer thunderstorms start building, even with a pre-dawn start.
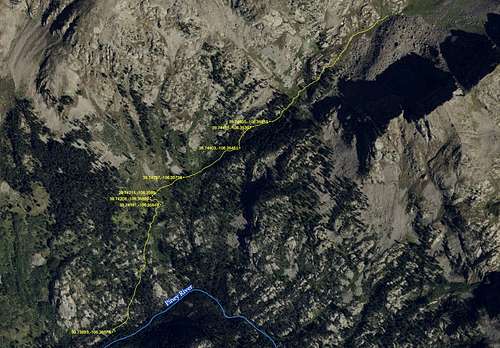
![Social Trail to the High Basin]()
Social trail to the base of Peak C and Mt. Powell: Expand full image to read lat/long waypoints.
![Large Cairn on the Piney River Trail]()
Cairn on the Piney River Trail
![Overview]()
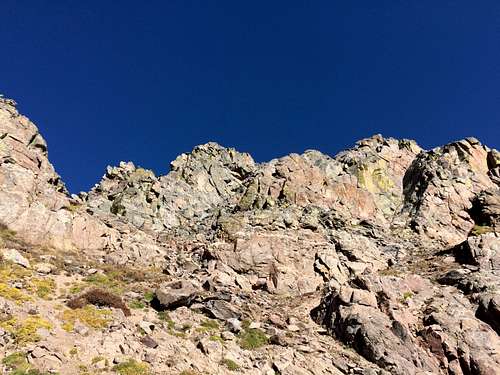
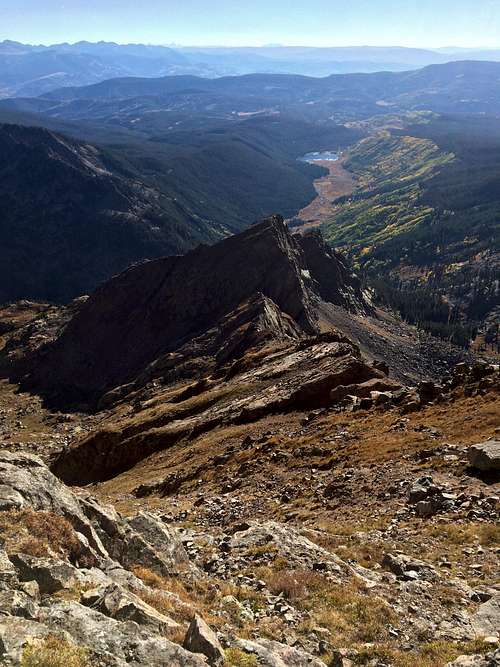
Overview: From the high basin, many routes reward different skill levels. Expand the full image for detail.The upper reaches of Peak C are very fun to explore. Familiarity with this mountain nurtures a desire to keep wandering along the Ripsaw Ridge. However, in addition to the elusive social trail, parts of this mountain can be misleading. It's not for beginners, and it would be very easy here to wind up in a dangerous situation. Some people will want rope, and others not. I kept running into a scarcity of information about this mountain, and so the following sections should help a range of intermediate to expert skill levels determine what routes are appropriate.
![Ripshaw Ridge from the Summit]()
Ripsaw Ridge from the Summit
![Peak C from the end of the social trail in the high basin]()
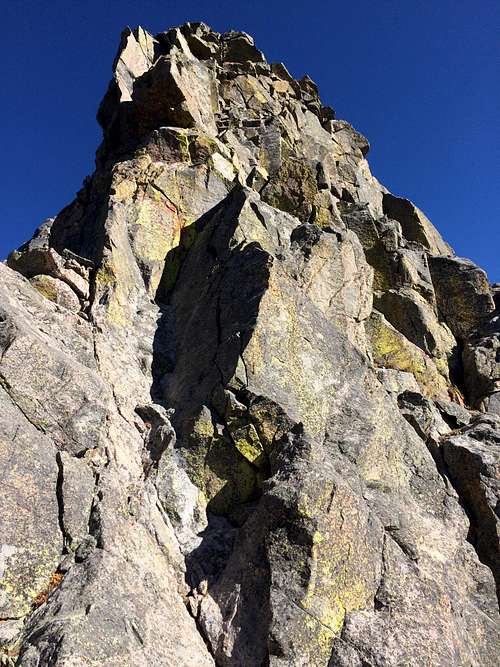
Peak C (center) from the end of the social trail in the high basin. Take the narrow couloir immediately left of the peak to access technical areas.To access the technical areas on the peak: From the high basin described above, locate the prominent "talus couloir" immediately left of the peak. This couloir is filled with relatively stable material and is an easy class 3 scramble. When you gain the very top of this couloir, remark at the exposure on the north face of the peak. From this point, turn right to start your class 5 climbing up the spine of the northwest ridge. (Gaining this talus couloir just for the view would be a fun option for a casual hiker.)
![Looking back at the hidden scree couloir]()
Looking back at the hidden scree couloir
![Northwest Ridge]()
Northwest Ridge - gained from the southwest-facing class 4 options. You can access the exposed northwest ridge by working left from the exit of the scree gulley.
Following the Social Trail
Social trail to the base of Peak C and Mt. Powell: Expand full image to read lat/long waypoints.
I decided to create a route page for Peak C, because after working on the peak for several years, I was not consistently following the the social trail. Even after getting to know the area well, and then hiking at a fast clip, it takes at least three hours to reach the high basin. It's frustrating to be delayed by a faint trail and unnecessary detours when the objective is to reach a great climbing area early in the morning. My personal philosophy is to maximize time on the rocks above timberline, and so this section is intended to provide you with a clear and expedient trek up to the good stuff.
I'm a minimalist when it comes to the mountains - axe only, no GPS ever needed. So when I was finally able to follow the entire length of this trail, I only had my cell phone and a basic topo app to take a few waypoints. To the right of this paragraph are those coordinates, which I have overlaid onto some base imagery. Then by closely looking at the base imagery and the waypoints, I have been able to trace the entire trail. The description below should help you avoid delays and feel confident about reaching the high basin quickly.
From the Piney River
About 2.5 miles up-river from the vehicle trailhead, there is a large cairn that marks the start of the social trail. A brisk hiker will reach this cairn in just over an hour. You can find the cairn by paying close attention to the Piney River trail:

Cairn on the Piney River Trail
1.) About 2/3 up the main trail to the cairn, the trail has gained some good elevation above the river. Suddenly there are a few switchbacks where you will feel snarky about having to lose the elevation. Do this, and then the trail will make a few bends around some rock outcroppings. Beware of switchbacks where foot traffic didn't see the correct turn and created several false trails.
2.) The main trail will go right down to the river, and then braid out along some good picnic areas adjacent to the river bank. Stay away from the river bank and keep your eye on the main area of travel. If you do this, you will stay on the main trail and approach the base of a very large rock that is within shouting distance of the picnic area. The cairn is here, and it is marked on the imagery with the first waypoint. At the cairn, the social trail will briefly parallel the main trail, and then it bends left into a small gulley.
3.) Immediately, the social trail heads north and upward to clip off a lot of elevation. The social trail is generally clear for this first segment, except for a few instances where it crosses solid rock. Soon it reaches a high knoll with a great view. This is the second waypoint. A careful eye will see the trail trend to the left, gaining more elevation. You may start to lose the trail at this point. Keep looking left, and you will find that the trail goes through a thick muddy area filled with willows. After passing the wet area, bend right again and gain just a little more elevation. You come out above the willows and can look in an easterly direction toward the main creek which falls from the basin. This marks the third and fourth waypoints.
4.) This is where I think most people lose the trail. The large meadow here is lush and vegetation makes the trail faint or non-existent. Your instinct will be to head more north-by-northeast, and continue gaining elevation along the northwest side of the meadow. Do not do this. Bear more right into an east-by-northeast direction, hold your elevation steady, and traverse the meadow area. Aim for the mountainside on the eastern side of the valley, and enter the trees on the east side of the meadow.
5.) The trail becomes even harder to find inside the trees, but it is there. If you lose it, simply keep traversing northeasterly and toward the mountainside on your right. Waypoint 5 marks the location of the trail inside of this tree area.
6.) Soon, the sound of the creek will be on your right. Stay within earshot, and generally parallel the creek to gain elevation. The trail will climb steeply through several boulder areas, where easy scrambling is required. Some sharp turns in the trail are present where it turns to gain elevation through the rocks. Don't try to avoid the boulders: the easiest and most direct path is to stay on the trail and scramble through them. In the vicinity of the 6th waypoint, the trail will have gained elevation above the creek and the water will seem distant on your right. Keep parallel to the creek, and the trail will come closer to the sound of the water once again. Occasionally the trail will even out between the boulder areas and pass through the trees. By staying on the trail, you should be able to find a remarkably nice campsite near the creek. From the campsite, continue gaining elevation through one last boulder area. A final scramble brings you into the high basin.
Coming down from the moraines and the upper meadow
The trail is very obvious inside of the high basin. On your exit, and as you pass the final moraine, the trail will approach the first boulder area. Your instinct will be to head right and find a more gradual contour to lose elevation. You will lose the trail if you do this. Instead, stay left to follow the trail, although it will seem to disappear as it tries to go left of the first boulders. Steeply and suddenly, descend on the left side of the first boulder area. Keep the sound of the water close to your left. It's easy to lose the path of the trail on the first boulder descent, but as soon as you come out underneath the first boulder area, the trail is visible again. Continue downward through the mix of trail hiking and bouldering, now keeping the sound of the creek on your left.
Climbing and Scrambling from the High Basin
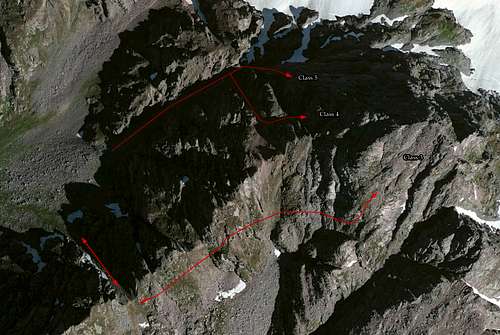
Overview: From the high basin, many routes reward different skill levels. Expand the full image for detail.

Ripsaw Ridge from the Summit
Technical Areas
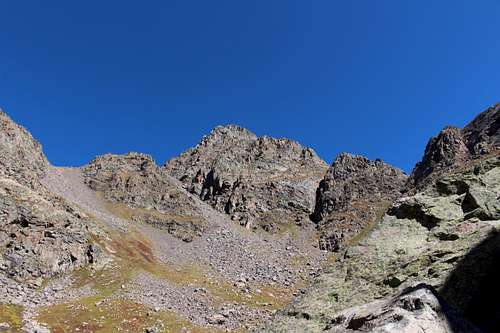
Peak C (center) from the end of the social trail in the high basin. Take the narrow couloir immediately left of the peak to access technical areas.
For less-exposed class 4 options, near the top of the talus couloir described above, keep your eyes peeled for a "scree couloir" that takes off to the right. (It is so discreet that the entrance can only be found from inside the main talus couloir - it can't be identified on the photo to the right.) This scree couloir is very steep, strenuous, and slippery. However I found the scree to be very compact. Using an axe, you should be able to anchor yourself quite well. Stay to the left side and use handholds on the solid rock face to help you gain over the steep scree pitch.
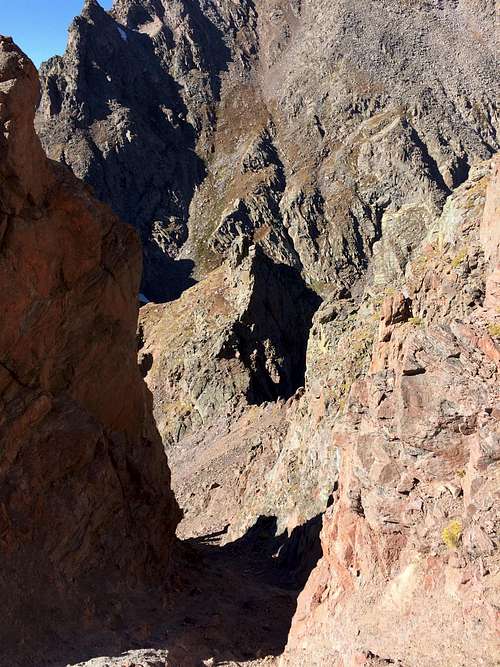
Looking back at the hidden scree couloir
If you aren't comfortable with the scree couloir, please don't try it. The enclosed space may give you a false sense of security. A tumble here is not ideal, and you would likely fall more than a hundred feet.
Remember also that people who "road runner" their way up material like this easily cause massive slides, scarring, and erosion. In Colorado we barely have enough volunteers to maintain popular routes on the 14ers. Your impact here is permanent.
Northwest Ridge - gained from the southwest-facing class 4 options. You can access the exposed northwest ridge by working left from the exit of the scree gulley.
When you come out of the scree couloir, you will be rewarded with a magically complex (and solid) class 4 area on the southwest face. Peak baggers will get impatient here because there are dozens of ways to reach the summit, but none of them can be seen clearly. However, those who enjoy exploring and routefinding will be delighted.
On this southwest face of Peak C, trend left and up for more difficult rock. Moving in this direction will allow you to rejoin the class 5 spine on the northwest ridge. If you do this, you will discover another gulley just above the scree couloir. It looks easy, but do not be tempted to follow it, because it takes you away from the summit and pinches out high above the main talus couloir.
Alternatively, trend right and upward, and you will eventually meet the northwest ridge on its final pitch to the summit. Moving in this direction, the far right side of the class 4 area is limited by a subtle "dividing feature" that runs vertically down the mountain. This feature divides the southwest-facing class 4 area apart from the southeast-facing class 3 bowl. It will be hard to see this feature as you approach it, but there are a number of spots where it allows you to look into the class 3 bowl described below. Compared to moving leftward toward the lower portions of the northwest ridge, I found the climbing was a little easier by moving right and gaining elevation on this "dividing feature" while I approached it.
- If necessary, there is an easy scramble that affords you a safe exit into the class 3 area. You can find this by contouring immediately below the class 4 material. Simply cat-walk to the right (in a southeasterly direction) and follow the toe of the class 4 rock as it leads you slightly underneath and then around the dividing feature. From here you enter the class 3 bowl on stable talus and tundra. Next, you can either approach the summit by heading left on an easy scramble, or you can leave the mountain by descending and contouring out of this bowl. (I describe this area more fully in the next section.)
- Whether or not you summit from this class 4 area, do not try to exit via the scree gulley. Instead, either descend from the summit into the class 3 bowl described below, or use the exit described in this paragraph to join that route at a lower elevation. Either way, leaving the mountain via the "second gulley" route that I describe in the next section achieves a painless re-entry into the first high basin where you can reconnect with the social trail.
Some people may be comfortable on the southwest-facing class 4 area without a rope, and others may really want one. It could be easy to ledge yourself in this area, and the routefinding is tricky with multiple possibilities. Overall it was the complexity on this mountain that I enjoyed the most. I found that by moving slowly, and frequently gauging my downclimbing options, I was comfortable. Although this class 4 area is smaller than other similar mountains I have tried around the state, I personally found it to be a lot of fun and I recommend exploring it. The rock is solid with lots of options and fun moves. It also reminded me a lot of the steeper pitches on the west side of Snowdon Peak in the San Juans.
Complex class 4 on the southwest face
Coming out of the scree couloir
Unexposed Scrambling
From the High Basin: Take the lowest (middle) gulley for an unexposed route to the summit
Scrambling in and out of the constricted area
Allow your eyes to find the summit of Peak C (on the far left side of this photo.) Then look right along the ridge at the three prominent couloirs. The middle one is your objective. It's broad enough to be more of a gulley, which you can ascend without gear on mixed talus, tundra, and some loose soil.
Descending the first slope below the peak, looking directly at the extending ridge which is intersected by the "middle gulley" traverse back into the high basin. Avoid the obvious (deeper) gulley that is left of this photo.
Once you have gained the "middle gulley" then you can enter the large bowl area on the southeast side of the mountain. From the top of the middle gulley, first exit by contouring away from it in a northeasterly direction. Try not to lose any elevation. By doing this, you will then enter a constricted series of narrow class 3 gulleys. The routefinding here can be ambiguous, but you should find a natural natural tendancy to curve leftward and up the mountain. As you work through this area, there will be a few places where some class 4 moves could arguably be made. However by carefully choosing your route and working around obstacles, you should always be able to stay on unexposed class 3 rock.
Soon after this constricted area the mountain will open up. As you get a feel for the openness of the southeast bowl, you may be tempted to head up toward a notch in the next ridge (high up and toward the right.) Before approaching either this notch or the high ridge, again trend leftward, but this time following an easy class 3 slope to the summit.
On the way down from the summit, you will be tempted to use this obvious route to exit the southeast bowl. However on close inspection, you will see that its exit is significantly below (and much farther away from) the "middle gulley" that you must traverse back over to. Hold right to re-enter the constricted class 3 area. You will be able to rejoin your traverse to the high basin more easily.
The Reward
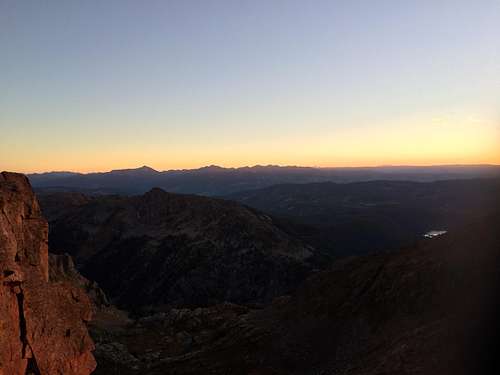
Sunset Near the Summit of Peak C
A cool fall day often permits lots of hours above timberline. After getting to know the area well, I was comfortable staying on the summit until sunset. I downclimbed in the twilight, and reached the social trail in time to put on my headlamp and hike out under a full moon.